# Right-click on your Database Engine, and click Properties
# Right-click on your Database Engine, and click Properties
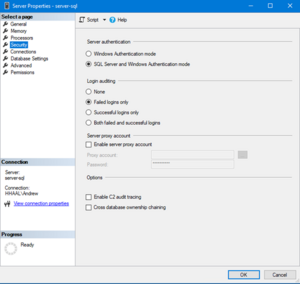
# Select the Security page[[File:SQL Security page.png|left|thumb|SQL Database Security page]]
# Select the Security page[[File:SQL Security page.png|thumb|SQL Database Security page|none]]
# Under Server Authentication, ensure that SQL Server and Windows Authentication mode is checked
# Under Server Authentication, ensure that SQL Server and Windows Authentication mode is checked
# Click OK
# Click OK
Line 110:
Line 110:
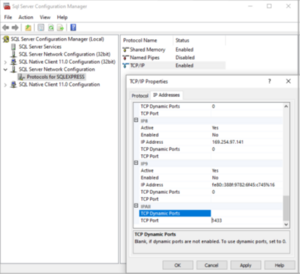
# Right click TCP/IP and click Properties
# Right click TCP/IP and click Properties
# Select the IP Addresses tab
# Select the IP Addresses tab
# Scroll to IPAll section and update the TCP Port to 1433[[File:Protocols for SQL Express.png|left|thumb|IPAII section]]
# Scroll to IPAll section and update the TCP Port to 1433[[File:Protocols for SQL Express.png|thumb|IPAII section|none]]
# Click OK
# Click OK
# Restart SQL Server so changes take effect
# Restart SQL Server so changes take effect
Line 150:
Line 150:
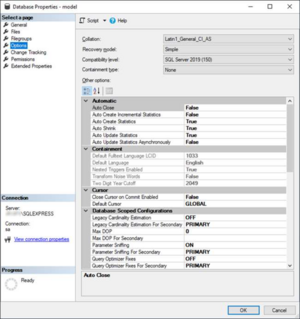
# Right-click the model database and click Properties
# Right-click the model database and click Properties
# Select the Options page
# Select the Options page
# We suggest you configure options as follows:[[File:Model Database Properties.png|left|thumb|Model Database Properties]]
# We suggest you configure options as follows:[[File:Model Database Properties.png|thumb|Model Database Properties|none]]
# Ensure the following options are set:
# Ensure the following options are set:
## Collation is either Latin1_General_CI_AS or SQL_Latin1_General_CI_AS
## Collation is either Latin1_General_CI_AS or SQL_Latin1_General_CI_AS
Line 158:
Line 158:
## Auto Update Statistics is True
## Auto Update Statistics is True
## ANSI NULL Default is False
## ANSI NULL Default is False
'''Zinform Login'''
The Zinform login is required for general day to day use of Zinform databases.
This maps directly to the Windows Zinform Security Group defined previously.
This means all Users belonging to the Zinform Security Group can access the Zinform
database.
To add the Zinform Login
# Open SQL Server Management Studio
# Connect to your Database Engine
# Expand Security, and then click Logins
# Right-click on Logins and click New Login…
# On the General page enter details as follows:
## Enter Login name as [Domain]\Zinform, e.g. Exodesk\Zinform
### If using Search, click Object Types and ensure Groups are checked
## Check Windows authentication
# Click OK
'''Intersoft Login'''
The Intersoft Login is required so that that Zinform can have System Administrator rights to the SQL Server, for example to create a new database.
'''To add the Intersoft Login'''
# Open Microsoft SQL Server Management Studio.
# Expand your server.
# Expand Security.
# Right-click on Logins and click New Login…
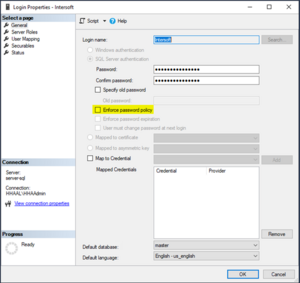
# On the General page set Login Name as intersoft, change Authentication to SQL Server Authentication and set the password. Contact Exodesk for the password. Note: Enter the password without spaces.
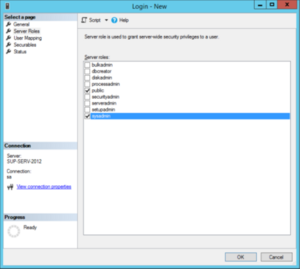
# Uncheck Enforce password policy.[[File:Intersoft User properties.png|none|thumb|Intersoft User properties]]
# 1. Click on the Server Roles page. Check the sysadmin Server Role. Note the 'public' role will already be selected automatically and this cannot be unselected.[[File:Intersoft User Server Roles.png|none|thumb|Intersoft User Server Roles]]
# Click OK.
# If asked, confirm the Login password.
== Upsize an Access Database to SQL ==
'''Upsizing an emPOWER Access Database'''
When an existing emPOWER Access database is upsized to SQL Server the emPOWER upsize facility must be used. The upsize should be done in emPOWER before Zinform is installed.
The Intersoft user must have been created for the upsize facilty, see under Installation & Configuration of SQL.
'''Database Naming'''
SQL Server Database names are case sensitive and may contain the following characters, A through Z, a through z and in addition may include, but not start with, 0 through 9, @, $, #, and _.
An SQL emPOWER database is prefixed with emPOWER_, eg emPOWER_DEMO. The upsize utility will automatically add this prefix, so no need to include it in the database name.
'''To Upsize an existing Access database'''
# The emPOWER database must be emPOWER version 4.1 or higher.
# Remove any extraneous tables created by the user in the duplicated database. Failure to remove any user defined tables may cause the SQL Server upsize to fail.
# Open the duplicated company in emPOWER.
# From the Tools menu point to Database, then click SQL Server Upsize. '''Server Name''' Enter the Server Name. Note, although this field has a dropdown list it may not be populated under Windows 95, 98 or Me. '''Database Name''' Enter the name of the database. See the notes on database naming earlier. '''Folder Location''' The folder location is the folder the SQL database and related transaction file is stored on the Server. It is the location on the '''Server''', not the local PC. It is strongly recommended this field is left blank and therefore the database is stored in the default location. '''Log File''' The log file records a log of the process, including date/time started/completed and any errors encountered.
# Click '''Upsize'''.
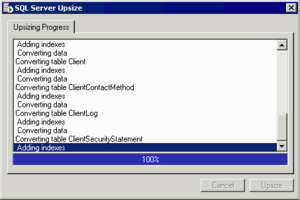
# emPOWER will then proceed to update the database to SQL Server.[[File:Database Upsize fig 2.png|none|thumb]]
# Once complete a “Success” message will appear.
# Zinform requires the database name to be prefixed with Accounts_ so rename the database post upsizing.
WARNINGS.
# The success message may also warn if any non-critical messages were generated – in this case the log file will contain more information.
# Non-critical error messages should NOT be ignored, instead they should be referred back to Exodesk before proceeding to use the SQL Server database.
'''Post SQL Server Upsize'''
'''Do not ignore any non-critical error messages.'''
Although SQL Server should use default values from the model database when creating a new database it may pay to check various database properties before using it in emPOWER.
'''To check database options'''
# Open SQL Server Management Studio(SSMS).
# Expand the Databases.
# Right click the emPOWER database created, then click Properties.
# Check the database properties. DO NOT change any permissions.
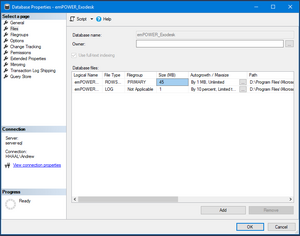
# The Data Files and Transaction Log tabs should automatically grow the files.[[File:Database Properties.png|none|thumb]]The Options tab should be ideally setup as below.
The Recovery Model should normally be set to Simple. For more information see the section on Backups.
'''Auto update/create statistics'''
Tells SQL Server to automatically build out-of-date or missing statistics required when running queries.
'''Auto shrink'''
Tells SQL Server to include the database for automatic shrinking.
== Installation of Zinform 5 ==
# Zinform requires MS Office 32-bit to be installed. If Office 64-bit is already installed this needs to be uninstalled and replaced with 32-bit.
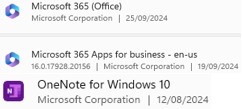
## Uninstall the following (note this may not be all that need to be uninstalled)[[File:MS Office.png|none|thumb|MS Office 64-bit uninstall items]]
# If the emPOWER database is Access then it must be upsized to SQL. This should be done via emPOWER before you start installing Zinform. See instructions for upsizing in the section Upsizing an Access Database to SQL in this document.
# If emPOWER is installed, it must be uninstalled first as the two cannot co-exist.
# If there is an existing SQL emPOWER database this will need to be renamed. emPOWER databases are prefixed with emPOWER_, e.g. emPOWER_Demo. This needs the prefix to be renamed to have a prefix of Accounts_, e.g. Accounts_DEMO.
# To install, run the Zinform Accounts 5 installer, run it as Administrator if you can.
# Leave the Create a desktop ticked and Click Next, and then Install.[[File:Create Desktop Shortcut.png|none|thumb|Create Desktop Shortcut]]
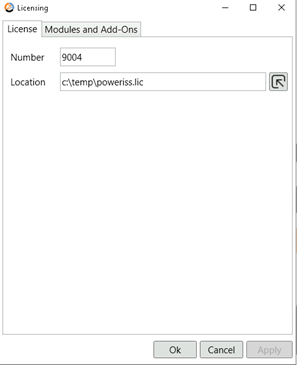
# The first time you open the database you will have to select the licence, the software will present a screen like the following. Browse to the folder where the licence is held, usually in the emData folder. The licence file is normally called power.lic but may be a variation on that.[[File:Zinform 5 Licence.png|none|thumb|Zinform 5 Licence]]
# To open the database the first time, use File/Open Company
## Select the database Type
## Enter the Server Name and select the database from the Database Name dropdown and click Open
Revision as of 22:41, 10 October 2024
Installation of SQL
These instructions are for new installations of SQL. Existing SQL installations for emPOWER or Zinform do not require any changes.
Installing using the Basic option is more straight forward but doesn’t give you the chance to specify items such as the System Administrator's password.
The recommendation is to install using the Custom option with the following options:
"Express Core" package
Include SQL Server product updates
There will be a warning regarding Windows Firewall and see notes below regarding this. You can drilldown to the link to review the warning information.
Give the instance a name e.g. "SQLEXPRESS"
For Zinform Accounts the Server Name will be [Domain]\SQLEXPRESS, e.g. Exodesk\SQLEXPRESS
Use the standard Collation order
Latin1_General_CI_AS
Mixed Mode (SQL Server authentication and Windows authentication)
Enter a strong password for your "sa" (System Administrator), and make sure you record this for future use. It is important you know where this is recorded.
Once complete you should install SQL Server Management Studio (SSMS), this will be required for backups and other database maintenance functions.
If you still have the SQL Server Installation Centre open then click Install SQL Server Manager Tools.
Create a Zinform Security Group on the AD Server and assign to it the users that will be using Zinform.
The Zinform Group allows you to easily give Users who require it access to all Zinform databases – rather than needing to assign individual Users to the database.
To add the Zinform Security Group if running Windows 10
Go to the Start menu, click Run and run lusrmgr.msc
The Local Users and Groups console should open
Right-click Groups and click New Group…
In the New Group wizard enter details as follows:
Group name as Zinform
Add Users under Members
Click OK.
Once added you can easily add or remove Users by drilling down to the Zinform group.
To add the Zinform Security Group for Windows versions
Run Server Manager
Open Tools and click Active Directory Users and Computers
Expand your Domain and click on Users
From the Action menu, point to New and click Group
In the New Object wizard enter details as follows:
Group name as Zinform
Group scope as Global
Group type as Security
Click OK.
Assign users to the Zinform group
Then add the users that to the group who have permission to open Zinform databases.
Run Server Manager
Open Tools and click Active Directory Users and Computers
Expand you Domain and click on Users
Right click the Zinform group and click Properties
Click on the Members tab
Click Add and add the Users required
SQL Server Configuration
SQL Server Security Authentication mode must be setup as "SQL Server and Windows Authentication mode", sometimes called "Mixed Mode". This is not recommended by some documentation, but it is needed to allow Zinform to automatically create and configure databases.
Open SQL Server Management Studio
Connect to your Database Engine
Expand your Database Engine
Right-click on your Database Engine, and click Properties
Select the Security pageSQL Database Security page
Under Server Authentication, ensure that SQL Server and Windows Authentication mode is checked
Click OK
System Administrator Login
As SQL Server is now configured in SQL Server and Windows authentication mode the sa or system administrator login should be properly password protected.
To assign a new password to sa
Open SQL Server Management Studio
Connect to your Database Engine
Expand your Database Engine
Expand Security, Logins
Right-click on your sa Login and click Properties
Under SQL Server authentication update the password
SQL Server Network Protocols
You need to ensure SQL Server protocols are correctly configured
Enable TCP/IP protocol
Run SQL Server Configuration Manager
Expand SQL Server Network Configuration
Enable TCP/IP if disabled
Right-click TCP/IP and click Enable
You may be required to restart your computer at this time
Right click TCP/IP and click Properties
Select the IP Addresses tab
Scroll to IPAll section and update the TCP Port to 1433IPAII section
Click OK
Restart SQL Server so changes take effect
Firewall Configuration
Next you need to ensure the firewall on the Server allows connections via the port specified previously.
Firewalls help prevent unauthorized access to computer resources. If a firewall is turned on but not correctly configured, attempts to connect to SQL Server might be blocked.
Opening a port in Windows firewall
From the Start menu, click Run and run wf.msc
In Windows Firewall with Advanced Security, in the left pane, select Inbound Rules.
In the Actions menu, click New Rule…
In the Rule Type page, select Port, and then click Next.
In the Protocol and Ports page, select TCP. In Specific local ports, enter the port number of the instance of the Database Engine, 1433 for the default instance (as defined previously).
Click Next.
In the Action page, check Allow the connection, and then click Next.
In the Profile dialog page, select the profiles that describe the computer connection environment when you want to connect to the Database Engine, and then click Next
In the Name page, type a name and description for this rule
Click Finish
Model database
Within SQL Server there are several system databases, including the master, model, msdb and tempdb databases.
The model database is used as the template for all databases created. When a database is created, the database is created by copying in the contents of the model database.
This means all the base settings of a new database are copied from the model database. The model database should be correctly setup before to doing anything else.
To check Model database options
Open SQL Server Management Studio
Connect to your Database Engine
Expand Server, Databases, System Databases
Right-click the model database and click Properties
Select the Options page
We suggest you configure options as follows:Model Database Properties
Ensure the following options are set:
Collation is either Latin1_General_CI_AS or SQL_Latin1_General_CI_AS
Recovery Model is Simple (Note: Regular backups of the database must be setup so the database can be recovered if required).
Auto Create Statistics is True
Auto Shrink is True
Auto Update Statistics is True
ANSI NULL Default is False
Zinform Login
The Zinform login is required for general day to day use of Zinform databases.
This maps directly to the Windows Zinform Security Group defined previously.
This means all Users belonging to the Zinform Security Group can access the Zinform
database.
To add the Zinform Login
Open SQL Server Management Studio
Connect to your Database Engine
Expand Security, and then click Logins
Right-click on Logins and click New Login…
On the General page enter details as follows:
Enter Login name as [Domain]\Zinform, e.g. Exodesk\Zinform
If using Search, click Object Types and ensure Groups are checked
Check Windows authentication
Click OK
Intersoft Login
The Intersoft Login is required so that that Zinform can have System Administrator rights to the SQL Server, for example to create a new database.
To add the Intersoft Login
Open Microsoft SQL Server Management Studio.
Expand your server.
Expand Security.
Right-click on Logins and click New Login…
On the General page set Login Name as intersoft, change Authentication to SQL Server Authentication and set the password. Contact Exodesk for the password. Note: Enter the password without spaces.
Uncheck Enforce password policy.Intersoft User properties
1. Click on the Server Roles page. Check the sysadmin Server Role. Note the 'public' role will already be selected automatically and this cannot be unselected.Intersoft User Server Roles
Click OK.
If asked, confirm the Login password.
Upsize an Access Database to SQL
Upsizing an emPOWER Access Database
When an existing emPOWER Access database is upsized to SQL Server the emPOWER upsize facility must be used. The upsize should be done in emPOWER before Zinform is installed.
The Intersoft user must have been created for the upsize facilty, see under Installation & Configuration of SQL.
Database Naming
SQL Server Database names are case sensitive and may contain the following characters, A through Z, a through z and in addition may include, but not start with, 0 through 9, @, $, #, and _.
An SQL emPOWER database is prefixed with emPOWER_, eg emPOWER_DEMO. The upsize utility will automatically add this prefix, so no need to include it in the database name.
To Upsize an existing Access database
The emPOWER database must be emPOWER version 4.1 or higher.
Remove any extraneous tables created by the user in the duplicated database. Failure to remove any user defined tables may cause the SQL Server upsize to fail.
Open the duplicated company in emPOWER.
From the Tools menu point to Database, then click SQL Server Upsize. Server Name Enter the Server Name. Note, although this field has a dropdown list it may not be populated under Windows 95, 98 or Me. Database Name Enter the name of the database. See the notes on database naming earlier. Folder Location The folder location is the folder the SQL database and related transaction file is stored on the Server. It is the location on the Server, not the local PC. It is strongly recommended this field is left blank and therefore the database is stored in the default location. Log File The log file records a log of the process, including date/time started/completed and any errors encountered.
Click Upsize.
emPOWER will then proceed to update the database to SQL Server.
Once complete a “Success” message will appear.
Zinform requires the database name to be prefixed with Accounts_ so rename the database post upsizing.
WARNINGS.
The success message may also warn if any non-critical messages were generated – in this case the log file will contain more information.
Non-critical error messages should NOT be ignored, instead they should be referred back to Exodesk before proceeding to use the SQL Server database.
Post SQL Server Upsize
Do not ignore any non-critical error messages.
Although SQL Server should use default values from the model database when creating a new database it may pay to check various database properties before using it in emPOWER.
To check database options
Open SQL Server Management Studio(SSMS).
Expand the Databases.
Right click the emPOWER database created, then click Properties.
Check the database properties. DO NOT change any permissions.
The Data Files and Transaction Log tabs should automatically grow the files.The Options tab should be ideally setup as below.
Database Properties - Options tab
Recovery
The Recovery Model should normally be set to Simple. For more information see the section on Backups.
Auto update/create statistics
Tells SQL Server to automatically build out-of-date or missing statistics required when running queries.
Auto shrink
Tells SQL Server to include the database for automatic shrinking.
Installation of Zinform 5
Zinform requires MS Office 32-bit to be installed. If Office 64-bit is already installed this needs to be uninstalled and replaced with 32-bit.
Uninstall the following (note this may not be all that need to be uninstalled)MS Office 64-bit uninstall items
If the emPOWER database is Access then it must be upsized to SQL. This should be done via emPOWER before you start installing Zinform. See instructions for upsizing in the section Upsizing an Access Database to SQL in this document.
If emPOWER is installed, it must be uninstalled first as the two cannot co-exist.
If there is an existing SQL emPOWER database this will need to be renamed. emPOWER databases are prefixed with emPOWER_, e.g. emPOWER_Demo. This needs the prefix to be renamed to have a prefix of Accounts_, e.g. Accounts_DEMO.
To install, run the Zinform Accounts 5 installer, run it as Administrator if you can.
Leave the Create a desktop ticked and Click Next, and then Install.Create Desktop Shortcut
The first time you open the database you will have to select the licence, the software will present a screen like the following. Browse to the folder where the licence is held, usually in the emData folder. The licence file is normally called power.lic but may be a variation on that.Zinform 5 Licence
To open the database the first time, use File/Open Company
Select the database Type
Enter the Server Name and select the database from the Database Name dropdown and click Open